This is the fourth of a series of posts dealing with the issue of how to access various source formats. This time we'll look at accessing Microsoft PowerPoint .ppt and .pptx formats.
PowerPoint unfortunately has no (older) XML format, and does not lend itself well to copy and paste. Probably the most effective method for accessing the text to translate is to save .ppt as .pptx files (if necessary) and then follow a similar method to that used for .docx and .xlsx where the file is renamed with a .zip extension and decompressed. After decompressing the file, translatable text will be spread out in a number of smaller files: slides/slide*.xml and notesSlides/notesSlide*.xml will probably contain most of the text. Note that textboxes are in drawings/drawing1.xml and similar files. To segment properly see my post on segmenting Office XML.
For PowerPoint WildCAT might be the best option. Look for a post coming up on the side bar where I'll look at WildCAT and make a script for connecting AppleTrans to PowerPoint.
Monday, August 18, 2008
Working With Sources (3) Microsoft Office - Excel
This is the third of a series of posts dealing with the issue of how to access various source formats. This time we'll look at accessing Microsoft Excel .xls and .xlsx formats.
Don’t forget that in some cases formatting loss may be acceptable. Consider whether the formatting is important to the content of the document before going any further. The simplest way to test is to select all, copy, and paste into an AppleTrans document and see if this yields reasonable results. For Excel documents this will likely not be the case. Many people use Excel to layout text and when the grid doesn't work add text boxes floating on top of the mess. These documents usually rely on the position of the text to communicate information about the relationship between the text so you will need to preserve it.
Fortunately Excel supports a number of text based formats that should make it easy to find one that will work, preserving the formatting and layout, while giving direct access to the text. In the "Save as…" dialog choosing "Excel 2004 XML Spreadsheet" will also preserve embedded images. For slightly more simple data, choosing an option like CSV (comma separated values) or tab separated values are also viable options.
The .xlsx file format that is default with Office 2007/8 is also good because it allows direct access to the underlying text while preserving layout. In addition it may provide you with a shortcut because the file format uses a shared strings table, so you could translate a string once and have it fill in every place it is used in the file at once.
Rename the .xlsx file in the Finder adding a ".zip" extension and decompress. Inside the file look for xl/sharedStrings.xml and then double-check for strings not in that file in each sheet file (found in xl/worksheets/). Note that textboxes are in drawings/drawing1.xml and similar files. To segment properly see my post on segmenting Office XML. After translating the file, compress the folder and rename it with the ".xlsx" extension.
Working With Sources (2) Microsoft Office - Word
This is the second of a series of posts dealing with the issue of how to access various source formats. This time we'll look at accessing Microsoft Word .doc and .docx formats.
Don’t forget that in some cases formatting loss may be acceptable. Consider whether the formatting is important to the content of the document before going any further. The simplest way to test is to select all, copy, and paste into an AppleTrans document and see if this yields reasonable results. For documents without text generation features (tables of contents), headers, footers or custom layouts using text boxes, the style support in AppleTrans should be able to handle most of these issues.
There are a number of alternatives when you wish to preserve formatting. The first is to view the results when exported to a file format that can preserve the extra formatting in text. One such format is the (older) office xml file, "Word XML Document (.xml)" in the "Save as…" dialog.
For the new OOXML format files (.docx) it is possible to work directly on the file without exporting it. Rename the file in the Finder, adding a ".zip" extension. Then decompress the file. Inside the folder are a number of files, but the main text flow of the document is contained in the word/document.xml file. Note that textboxes are in drawings/drawing1.xml and similar files. To segment properly see my post on segmenting Office XML. After translating the text in that file, zip the main folder (possibly by using the compress action in the context menu) and rename it with the ".docx" extension.
A final option involves using WildCAT. Please see the (future) post about that in the sidebar.
Working With Sources (1) (Rich) Text Formats
This is the first of a series of posts dealing with the issue of how to access various source formats.
Don’t forget that in some cases formatting loss may be acceptable. Consider whether the formatting is important to the content of the document before going any further. The simplest way to test is to select all, copy, and paste into an AppleTrans document and see if this yields reasonable results.
AppleTrans supports text based formats (such as xml/html) as well as rich text and rtfd (Apple's "rich text with images") formats. Selecting these files in the open dialog will create a new AppleTrans document with the contents of the file. When segmenting xml or html you should make sure to use the special segmenting rules to ignore the xml and html codes.
That's all there is to it!
How to AppleTrans
Basic Workflow
In this post we’ll look at the basic work flow for translating a text using AppleTrans. If you are looking for more information about what AppleTrans is, what it can do for you, or how to get it, please follow this link or click on the preface link in the Table of Contents. Follow along using the practice text given below.
Practice
I see a small cat that is climbing up a long green wooden pole in an attempt to catch 6 funny sparrows. I see a big cat that is climbing up a long green wooden pole in an attempt to catch 6 funny sparrows. I see a big black cat that is climbing up a long green wooden pole in an attempt to catch 6 funny sparrows. I see a big black cat that is climbing up a long green wooden pole in an attempt to catch 6 gray sparrows. I see a big black cat that is climbing up a long green wooden pole in an attempt to catch 26 gray sparrows. I see a big black cat that is climbing down a long green wooden pole in an attempt to catch 6 gray sparrows. I see a big black cat that is climbing up a thick green wooden pole in an attempt to catch 6 gray sparrows. I see a big black rat that is climbing up a long green wooden pole in an attempt to catch 6 gray sparrows. I see a big black cat that is climbing up a long green wooden pole in an attempt to catch 6 gray mice. I see a big black cat that is climbing up a long green wooden bench in an attempt to catch 6 gray sparrows. I see a big black cat that is climbing up a long yellow wooden pole in an attempt to catch 6 gray sparrows.
Document
The AppleTrans document (extension: .alair) is essentially a derivative of TextEdit. That is, it is a rich text (and rtfd) editor, and includes (via the menus) all the associated tools (fonts, colors and so on) and supports the normal dragging and dropping text and images, basic editing and so on.
Perhaps the easiest way to get your source document into AppleTrans to translate is with a simple copy and paste. This works well for documents without special layouts or complex formatting. Check the sidebar for posts about getting other formats into AppleTrans to translate.
Segmenting
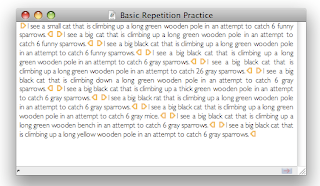
In order to take advantage of the CAT features in AppleTrans, it is first necessary to cut up the source text into reusable segments. In the image above each sentence is surrounded by orange arrow shaped markers. These markers indicate the boundaries between segments. The Segment tool can be opened by clicking Segment… in the Segment menu inside the Tools menu. The keyboard shortcut is Command-Option-F.
Mnemonic: Command-Option-F[ragment]
Selecting the appropriate segment rule and clicking Segment All should be all you need to do. Sentence (English) should work for most European languages and Sentence (Japanese) works for English as well as Japanese and possibly other East-Asian languages.
When you’ve segmented your document you can go on to the next step, but you may want to adjust the segmentation to take into account such factors as there being parts of the document such as images that you do not want to translate or incorrect segmentation for abbreviations and addresses, depending on your needs.
To remove segmentation markers select the text and choose Restore from the Segment menu or press the keyboard shortcut.
Mnemonic: Command-Option-R[emove segmentation]
To add segmentation markers around a custom grouping of text, select the desired text and choose Segment Selection from the Segment menu.
Mnemonic: Command-Option-S[egment selection]
Corpus
AppleTrans corpora (one Corpus, two corpora) are where most of the translation workflow takes place. Create a new corpus from the File menu or by pressing Command-Shift-N.
This simple looking interface hides a number of complexities. It represents a window into the translation memory database stored in the related file. It has functions and algorithms that let it analyze source text and find related translations that it has stored. The corpus can, in some cases, automatically translate sentences and whole documents. A corpus can share this functionality and its data over a network, and can reach into other applications to grab and manipulate text.
Let’s just start with the basics. Clicking the downwards pointing triangle button (“get”) on the side gets the next segment from the front AppleTrans document and puts the text from the segment in the two text panes. The top text pane is for the source text. The bottom text pane is where you type in the translation of that text. After you have translated the text, click the Record button to put the translation into the memory and click the circle button (“set”) to send your translation back to the AppleTrans document.
Get the next segment by pressing the “get” button. This time we can take advantage of the sentence we just translated. Tell the corpus to look for matches by clicking Find.
In the top right Status Field it says, “Record 1/1, Score 0.92.” This says that we are viewing the first record out of the total number of records in the translation memory that were considered close matches to the source sentence, and that this record is considered to be a 92% match of the source. See that AppleTrans highlights the word that is different. This time the original sentence was about a big cat. To use this translation as the starting point for our new translation, option-click either one of the arrows beside the Status Field. (These arrows let you select between different matches if there are more than one.)
Now the Status Field says, “Original Text” to show that the source pane contains the original source text with the difference highlighted. The translation pane has the translation from memory. Adjust the translation to match, record and send it back to the document.
Shortcuts
This time let’s take advantage of a few shortcuts. Note that to take advantage of the Control-Arrow shortcuts you will need to make sure that they are not in use (for example, by Spaces).
Mnemonic: Command-Option-G[et next and search]
Mnemonic: Control-Up/Down Arrows (move through the matches in memory, just like clicking on the arrows by the Status Field)
Mnemonic: Control-Left Arrow (go back to the original, keeping the matched translation)
Mnemonic: Command-Option-S[end translation to document and save record]
Using the shortcuts, finish translating the document.
Finishing
When the translation is complete, you can copy and paste out the text or choose an appropriate format in the “Save as…” panel to export the translation.
Subscribe to:
Comments (Atom)

